|
|

Getting Started With Zed
MAKING THAT FIRST BOX
By 'Bloodguard' [email protected]
Credits
Thanks to these people that helped or contributed to this document.
Sane Psycho -
being online and helping me work out the steps.
Tribes Programmers - for their tutorial as the basis to work from.
Chris "Bosshog" Line - his tutorial on how to use the registeruserobjects.cs
The Pokey's Forum - I needed their rumors and ideas to track down how to make Zed work.
This tutorial will focus ONLY on just enough to help you understand the process.
Step 1.Start ZED by double clicking on the ZED icon.
The Zed.exe should be in the TRIBES\TOOLS\ZED folder.
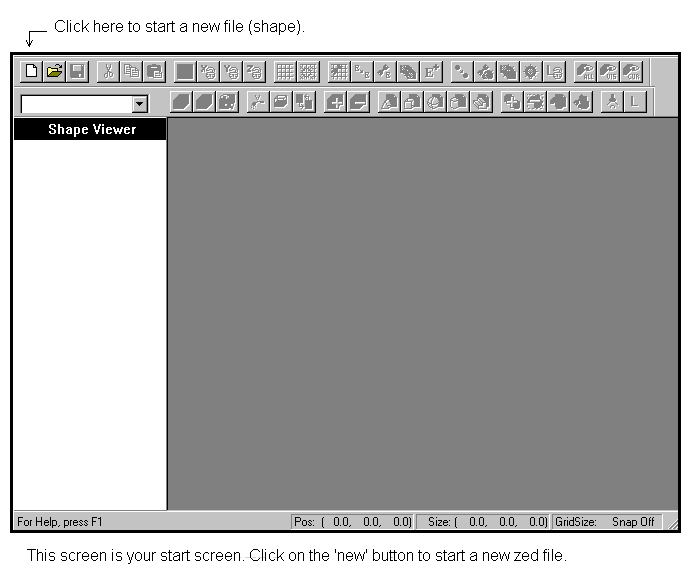
Step 2. Start a new shape by clicking on the 'new' button as shown below.
 |
Step 3. The 'Specify New ZED File Parameter' Dialog Box.
 |
This Dialog box requires you to provide important information for ZED.
In this tutorial you can leave the File Name just as it comes up. This will help you to keep things straight. If you choose to change the name to something more descriptive such as Box1 that is fine too.
Special Note:
There are times when having a problem editing a shape or converting through ZEDSHAPE and VMERGE that the use of a file name over and over can cause confusion and add to you problems. When having problems with your shape starting over with new filenames can be a big time saver.
For the following instructions (you should read this document through at least one time before attempting the tutorial) make sure you have learned to use a volume extractor program. This tutorial will be provided with the following files for you to use.
Palette File (.ppl)
lush.day.ppl was extracted from lushWorld.vol
lush.day.ppl
Material List File (.dml)
human1.dml was extracted from Human1DML.vol
human1.dml
The volume files listed below will be found in the TRIBES\BASE directory. Just 'click' the browse button to find them.
Palette Volume File (.vol)
lushworld.vol
Textures Volume File (.vol)
human1dml.vol
Step 4. Click on the 'OPEN' button when done.
Step 5. SHAPE VIEWER PROPERTIES - Right Click in the white open area of the 'Shape Viewer ' Window.


Let's look at the Properties dialog box. Not much to look at. Click on the 'Build' tab.
 |
Now the dialog box looks like the one below. Or it should.
 |
If it does not look like the image above 'Make it so'. What's important here is that the Geometry Scale be set at 0.03125. Once you set this, you will not have to change it anytime soon.
Click the 'OK' button when done.
Step 6. Click on the 'Create Cube' button
from the tool bar button to bring up the Create Box dialog box.
 |
Again, make sure your screen looks like this. This will be a simple 'hollow' box.
Click on OK.
Now we can start working with ZED.
 |
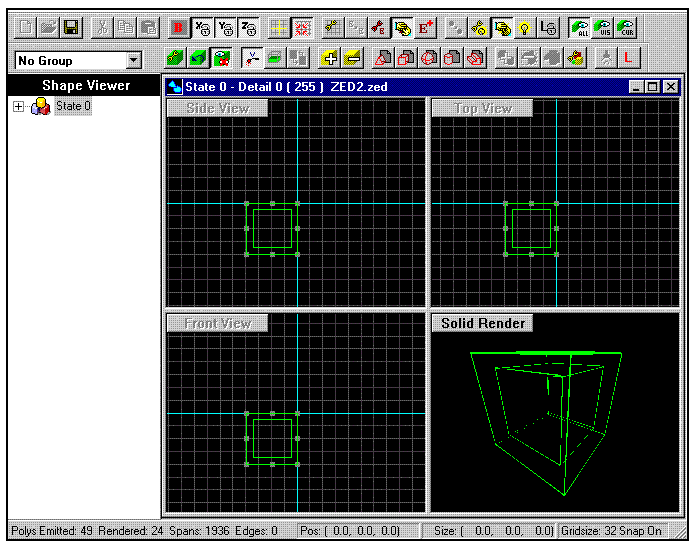
It is important to understand what you are looking at here.
The 2D views shows you what looks like a shape. It is not really a shape. It is a 'primitive'. You can see there is a double box appearance to it. That shows you that what you create will be hollow. If you don’t see that, then close the file and start a new file without saving the old one.
Keep in mind that the primitive is the GREEN image.
Step 7.
The Solid Render View is showing only part of the primitive. Work with it and get the green 'primitive' all in view. Clicking the mouse in the Solid Render Window will allow you to work with the view.
Next, move the green 'primitive' until it look like the next image.
 |
If it looks like the above screen, you are right on target.
![]() Step 8. Click on the Add Brush button
Step 8. Click on the Add Brush button
to create your new shape--a hollow cube.
Use your mouse to move the green primitive brush away from the newly created brush. That’s right just like in Quake, they call it a brush.
Notice how I move the green primitive over and out of the way, leaving the new hollow purple box visible. Make your screen look the same.
 |
Step 9. Click on the Reset Brush button
to reset the primitive brush to its original shape. (That's what the original ZED Manual says it does)
THIS IS THE POINT AT WHICH WE WILL DO THINGS DIFFERENT THAN THE ORIGINAL ZED MANUAL.
We will not make a doorway for this shape even though it is hollow. This tutorial will focus ONLY on just enough to help you understand the process.
Now your screen should look like this.
 |
Justclick on the grey bar titled 'Solid Render'. A drop down menu box will allow you to select 'Texture' view.
You may have to do it more than once to get it to show up. Be patient.
Of course, you don’t have a texture selected for it so you won't see anything different.
We have to apply a texture to the box. That's where Step 10 comes in.
Step 10. To apply a uniform texture to the object, first select the cube by clicking on it in one of the 2-D windows.Remember the green object is the 'primitve', the purple shape is the one we will texture.
 |
Click on the Brush Attributes button
to bring up the Brush Attributes window. (Notice how we went from calling it a shape to calling it a brush?)
Both terms 'shape' and brush' is correct. And they both mean the same thing.
 |
Now, you are likely saying to yourself, "Self! This is looking complicated."
Well we will only make one change to this 'Brush Attributes' dialog box.
Go up to where you see the 1highlighted.
Type in the number '53'. Why '53' cause it has is 128x128 just like your box shape.
No need to stretch or do anything special. Simple right!
Click on 'Apply'. The box closes and you are back to your 4 views.
To see the texture just applied, you need to click on that 'Quick BSP' button.
Now your screen should look like the following.
 |
What we just did was apply to all sides of the box. But as you learn more you can apply only to the side or sides you choose.
Step 11. Now we gonna do the 'Add Light' Thing.
Look for the 'Place ' icon.
It should say 'Place Light' but it don't. Click the icon and it will place a light object in your 2D views as shown in the screeen below.
 |
The Light objects show up on my screen as a fat * with a cyan color. Make sure that the light object is outside the box. If it is not outside the box, then position it so that it looks like
We need to set the properties of the light object. Click on the Light Editor icon.
And you will see the 'Light Viewer' Panel appear.
 |
 |
Set your Properties box values to match those of the screenshot below
 |
Double check the values and Click on the 'Apply' button. Close the box.
Step 12. Save and Export.
Ok!! We are getting close to the end. Please save your shape. ( I hope you have been saving after each step.) AND REMEMBER THE FILENAME YOU USED!!!
Next, you must export you shape to a .ZVL file.
Go to the File pull-down menu and select "Export Optimal to ZVL." This will convert the shape from .zed format to .zvl format. If you want to you can quit out of ZED once this process is done. If you plan on doing a lot of shape building and you have a lot of ram and a powerful cpu, then you can keep it open, it wont hurt anything.
Open a DOS box using the DOS PROMPT icon and go to the folder containing ZED. Enter the following dos command:
zedshape box1.zvl
There is a space between zedshape and box1
Once the zedshaping process is completed enter the following:
vmerge box.vol box1.div
There is a space between vmerge and box.
This will create a new volume for your object. Exit out of DOS and locate the box.vol file. Place it in TRIBES \BASE directory.
Now take the file 'registeruserobjects.cs' from the items provided with this tutorial and Place it in TRIBES \BASE directory.
Double click on 'registeruserobjects.cs' to edit it with notepad or wordpad.
In the 'registeruserobjects.cs' file you will find the following line:
MissionRegDis( MyZedObjects, beam);
MyZedObjects refers to the menu name that you can decide for your shapes to be under.
Beam refers to each shape.vol you want to add under that menu.
So if you want your menu to be called Custom Objects that’s OK. Then when you create all those great shapes such as (castles, temples, throngs and toilets) each will be a different volume file and your file could look like the following :
MissionRegDis( CustomObjects, castles);
MissionRegDis( CustomObjects, temples);
MissionRegDis( CustomObjects, throngs);
MissionRegDis( CustomObjects, toilets);
Of course for now your's will look like this :
MissionRegDis( CustomObjects, box);
Save your changes and close the file.
Step 13. Making it Work in TRIBES.
Open TRIBES and go to the Mission Editor.
NOTE: YOU SHOULD ALREADY KNOW HOW TO ACCESS AND USE
THE TRIBES MISSION EDITOR.
Press F2 and locate the group named "MissionGroup\Volumes". Highlight it.
Press F3 and select "Mission\Volume" and enter the name of the volume (in this case, "box.vol"). Click on OK when done.
This process must be repeated for each object.vol you wish to add. And it has to be repeated for each mission you edit. But once you put a .vol file in a mission it will always be there. This object will now appear in the Mission Editor the each time you open it.
Note: if you find that your shape doesn’t look right, remove it from the registeruserobjects.cs file and run TRIBES. Running TRIBES will force TRIBES to clear it .vol file from its memory.
Lastly, scroll down the menu list of Volumes to the bottom and you should see your new CustomObjects Title. Click on that Title and you should see the new box.vol show up on the right hand column for objects. That's IT!!! Now Get To Work!!!
Appendix A: Zed Units and Real World Measurements.
Once you have placed the box in a mission in TRIBES, you might notice that the player (light armor character) is about half as tall as the 128 zed unit box (zu.) measurement. With that in mind I assumed (and I could very well be way off on this) that the player is 6 feet tall or 64 zu. in height. I worked on another zed shape to test the ' look' by building a bed to the below dimensions. After placing two copies of my bed shape and letting my light armor player walk around it, it fit the visible 'look' to the size. So, I have included the conversion chart I developed to help give you a sense of measurements in zed units to feet and inches. If it helps you use it.
|
|||||||||||||||||||||||||||||||||||||||||||||||||||||||


